
Guideline for Changing Mount PL/EF/LPL
Guideline for Changing Mount PL/EF/LPL
This guideline takes exchanging Catta Ace 35-80mm PL mount to EF mount as an example:
(This can also be applicable for mount changing from PL-EF/ EF-PL/ PL-LPL/ LPL-PL/ EF-LPL/ LPL-EF).
Attention: When tightening the screws, the recommended torque is 0.4N · m. Torque exceeding this value might cause screws to break!
MountDisassembly
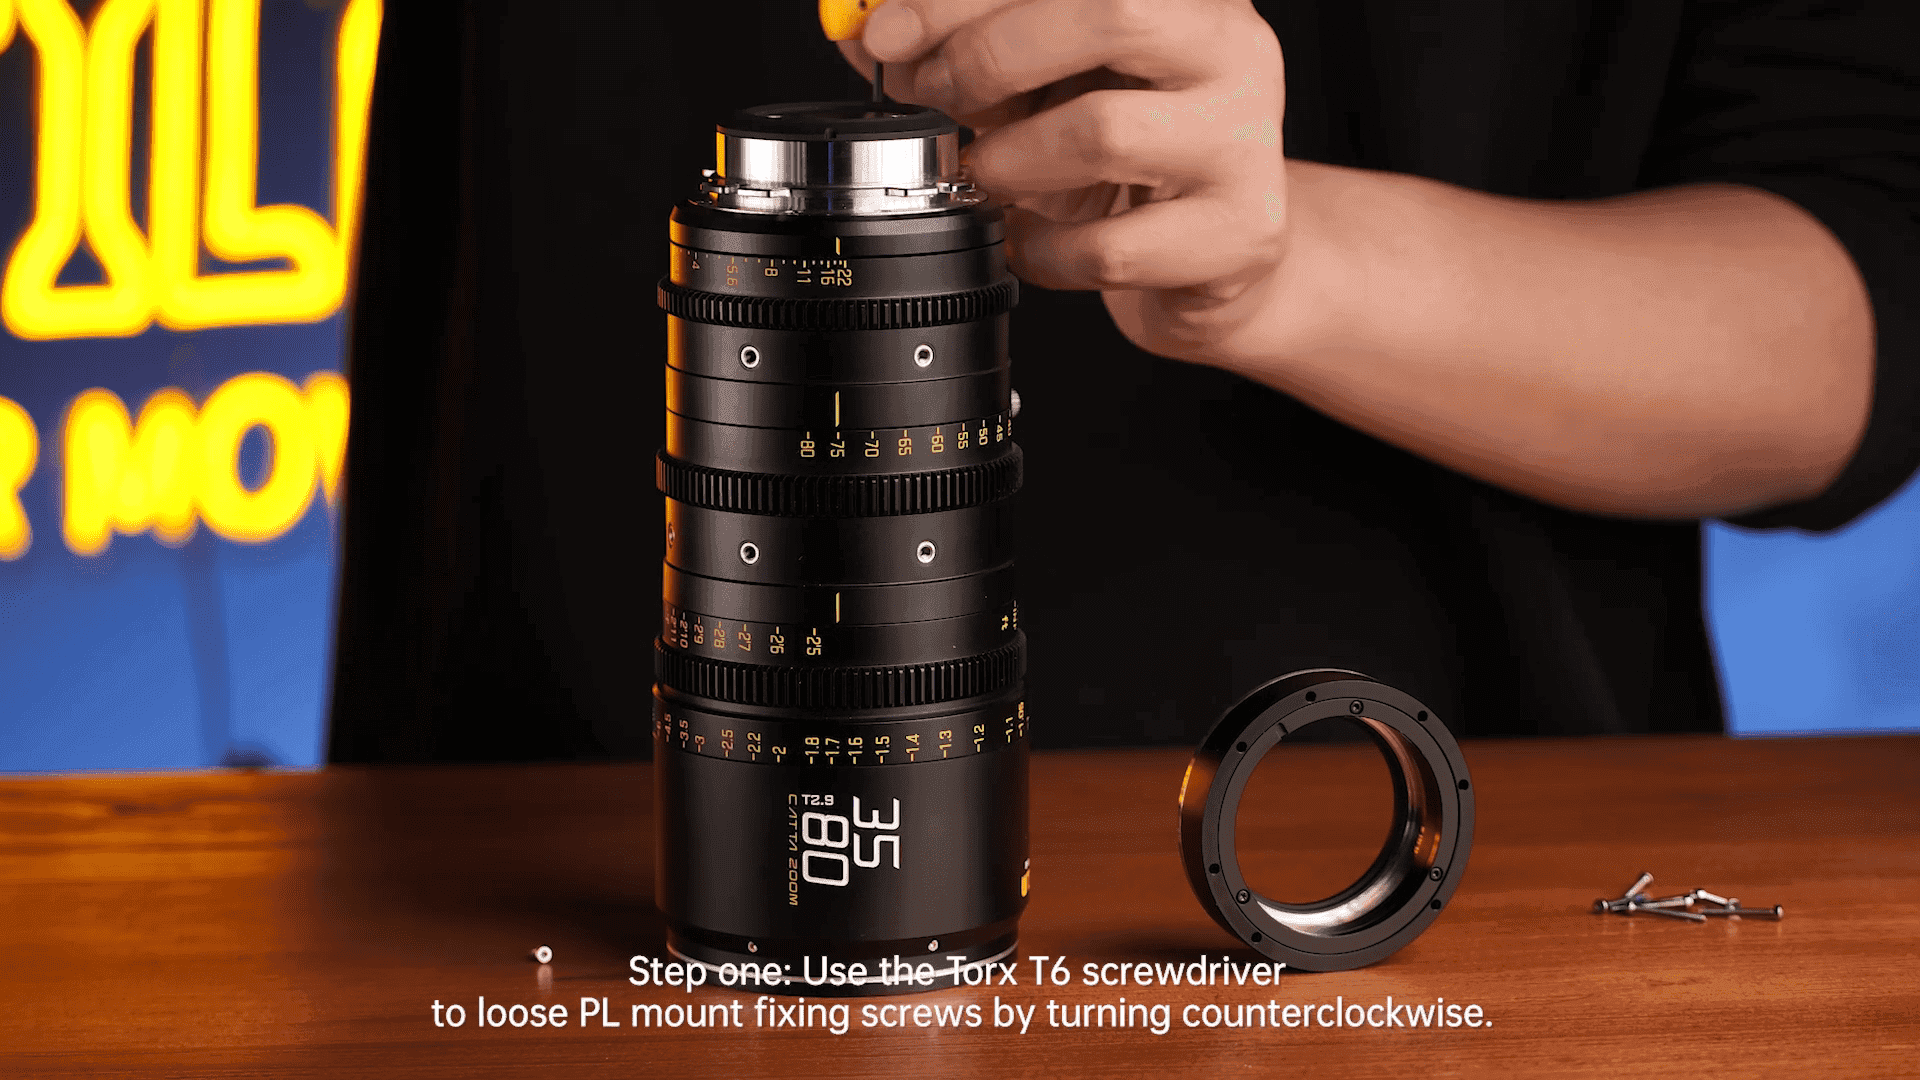
Stepone:Use the Torx T6 screwdriverto loose PL mount fixing screws by turning counterclockwise.

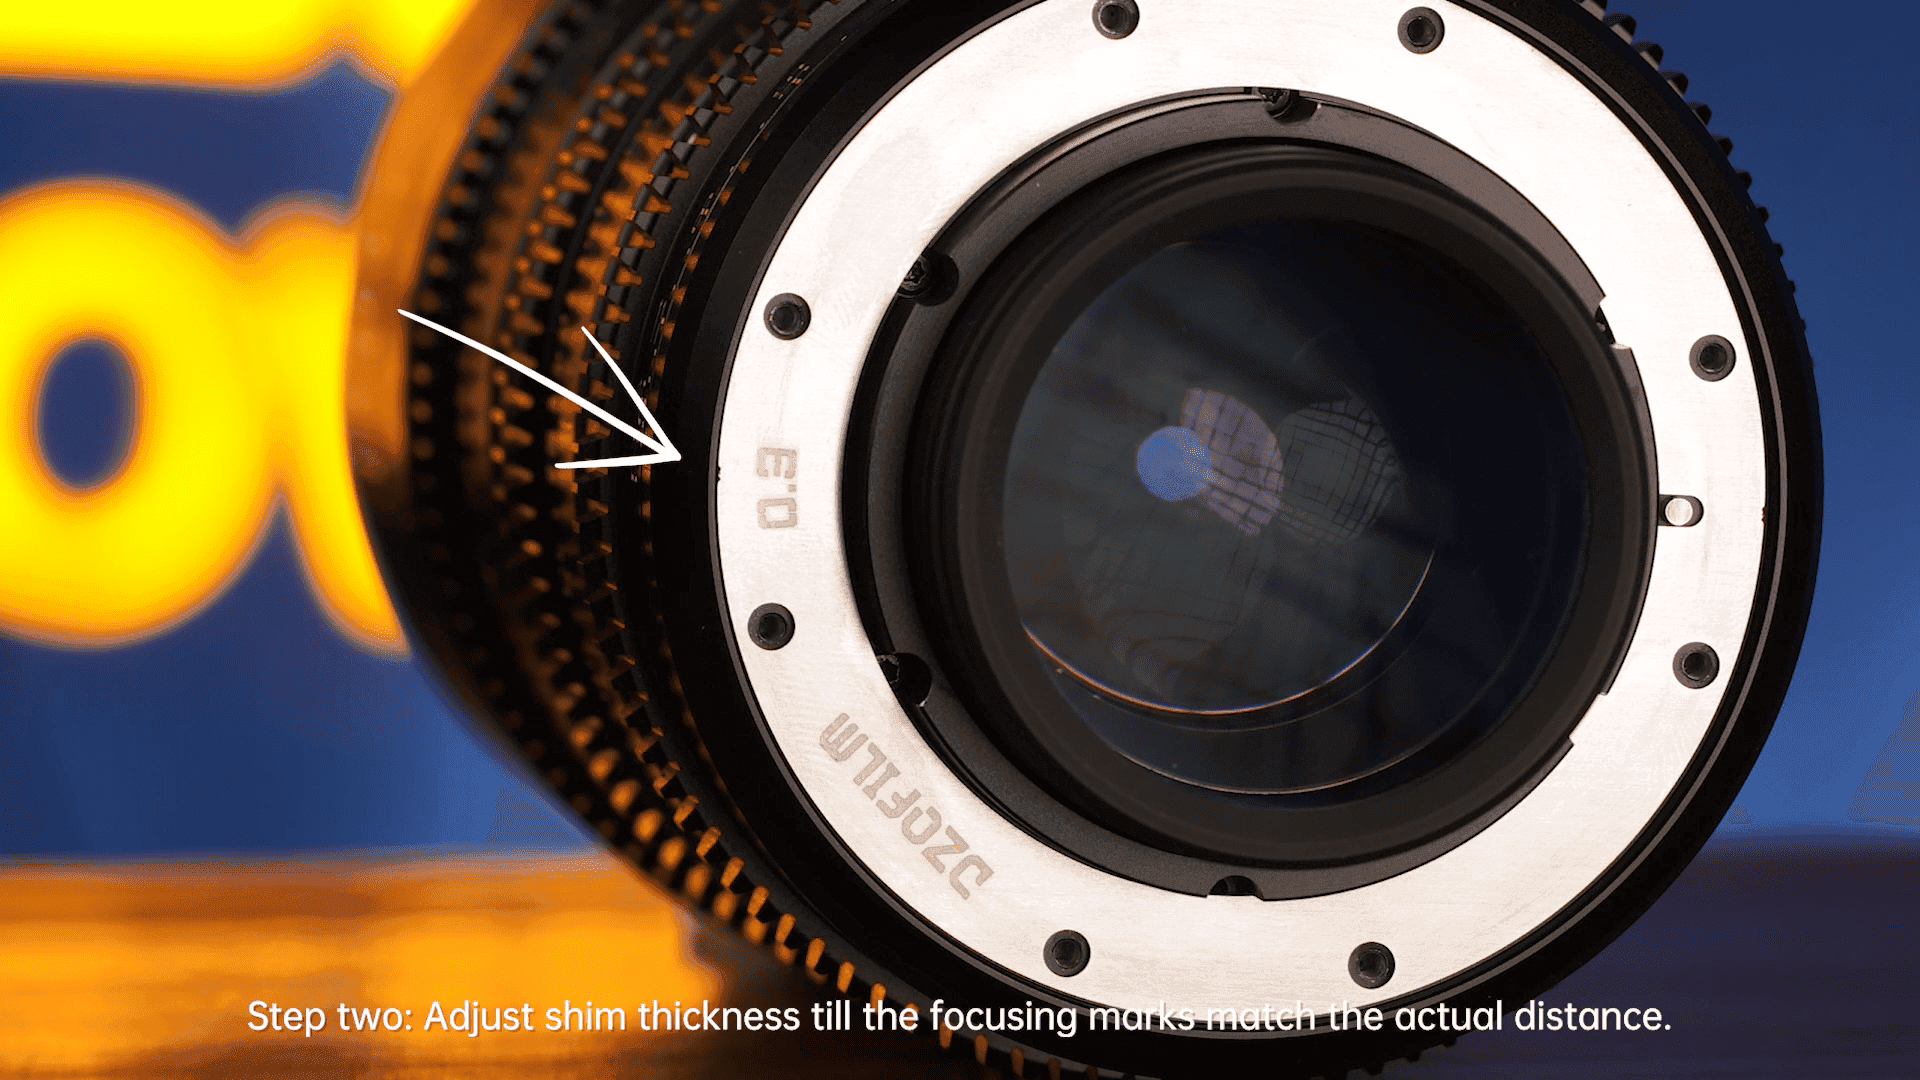
Steptwo:Adjust shim thickness till the focusing marks match the actual distance.

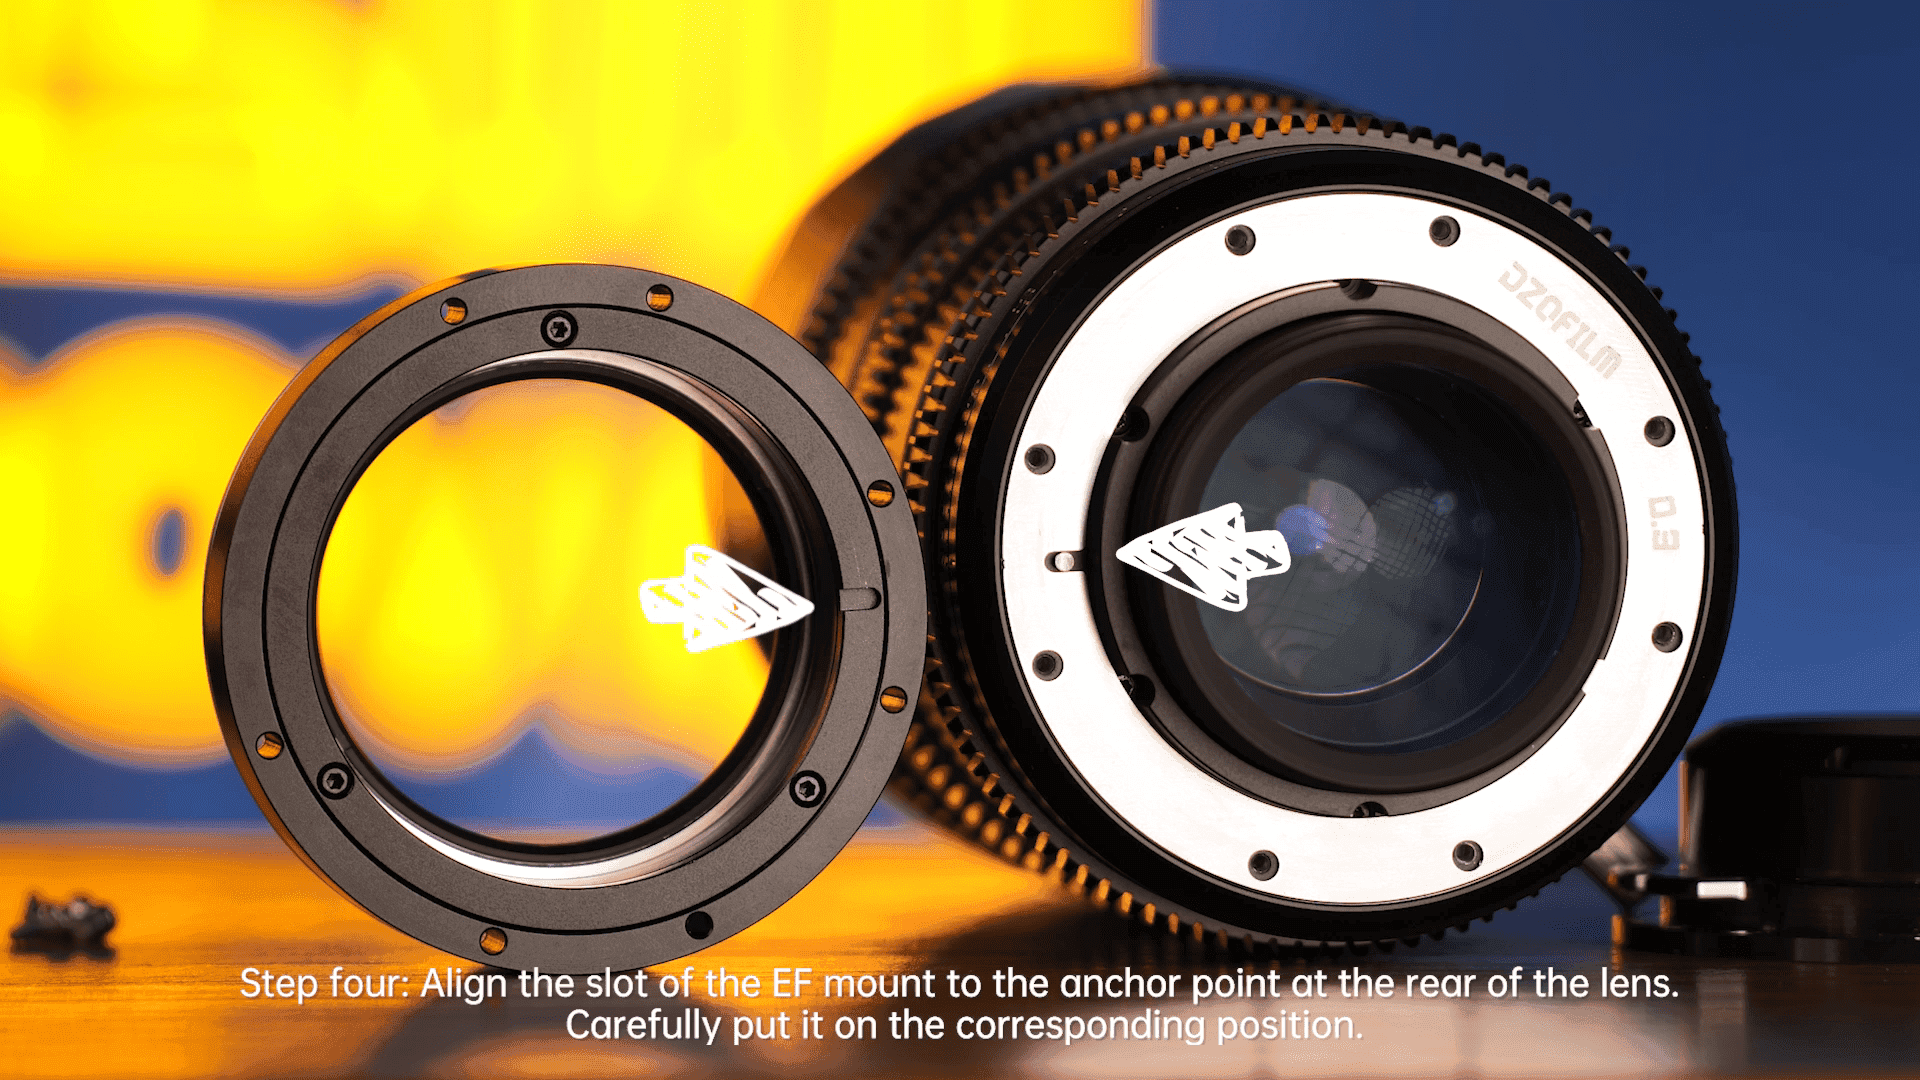
Step three:Find the anchor point at the rear of the lens -- the alignment pin on lens mount.

Take out the EF mount, find the anchor point of EF mount - the slot on EF mount.

Step four:Align the slot of the EF mount to the anchor point at the rear of the lens. Carefully put it on the corresponding position.
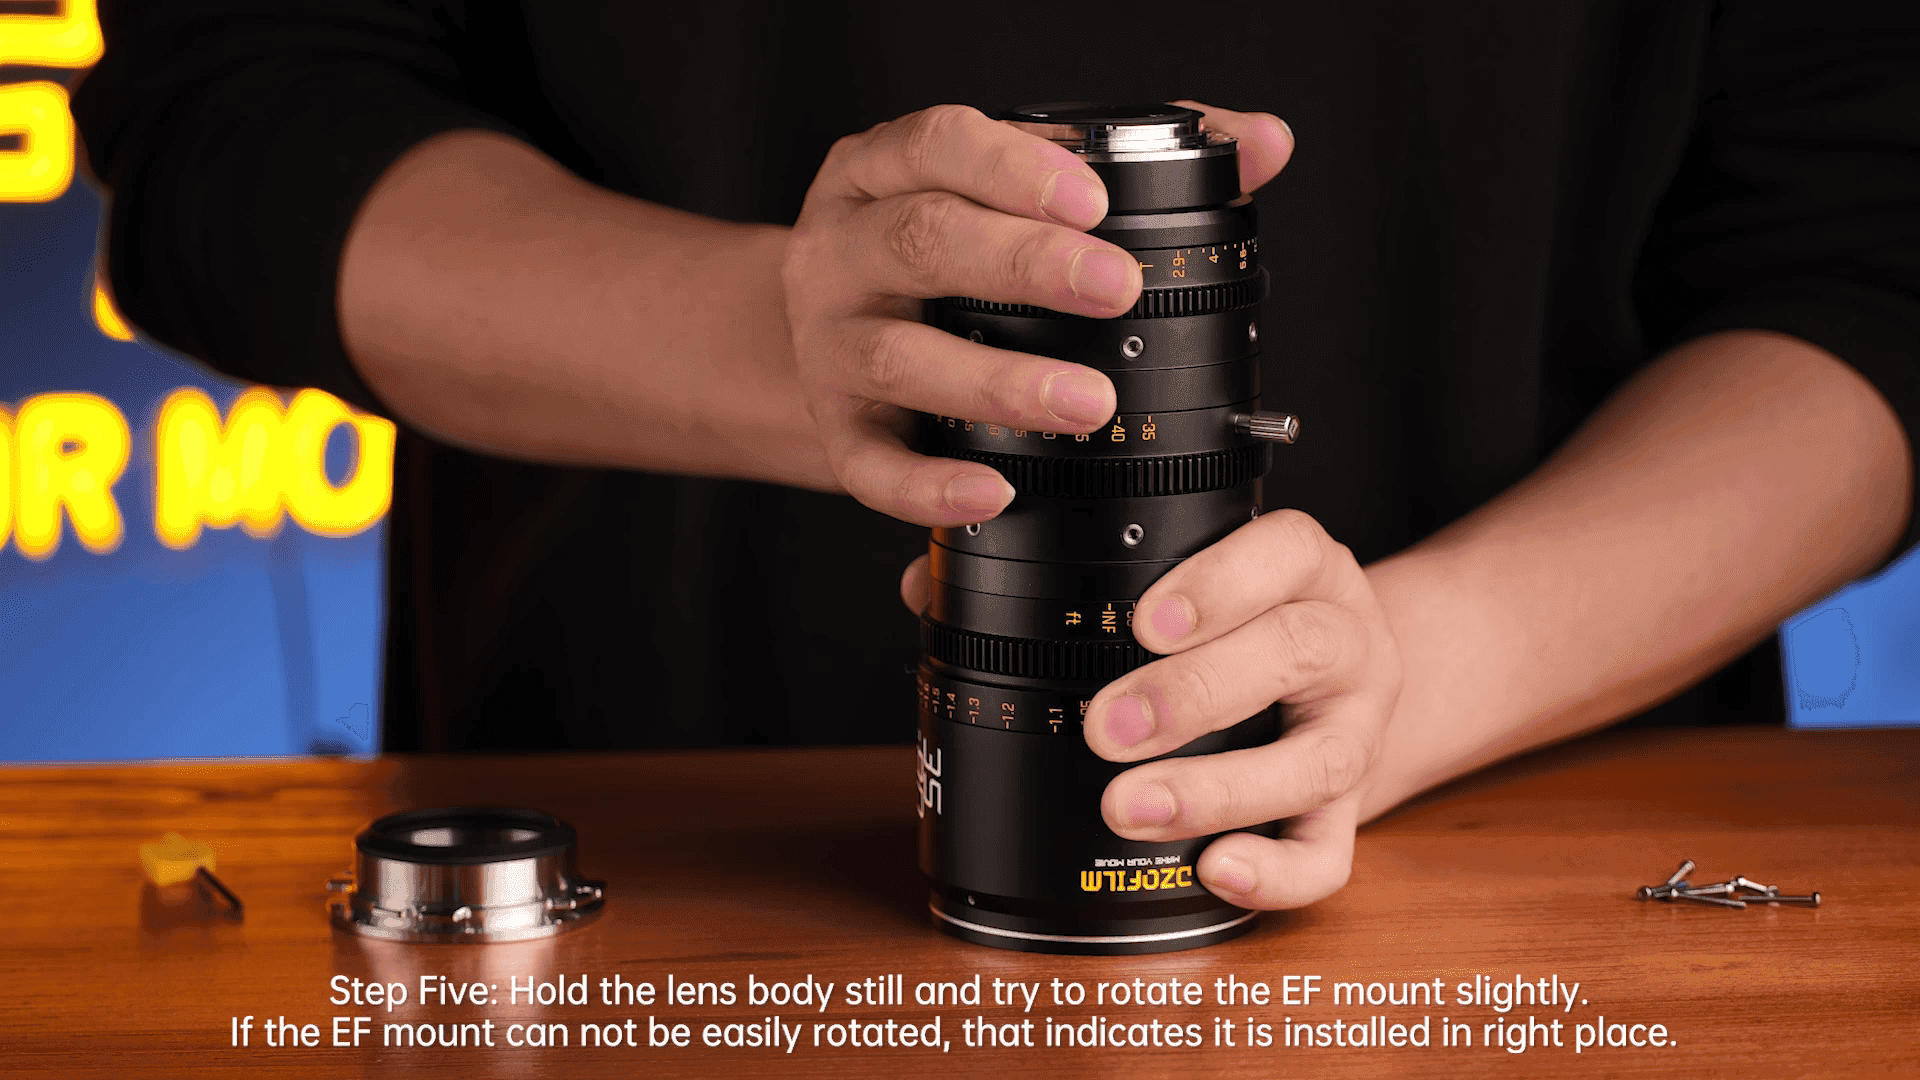
Step Five:Hold the lens body still and try to rotate the EF mount slightly.If the EF mount can not be easily rotated, that indicates it is installed in right place.
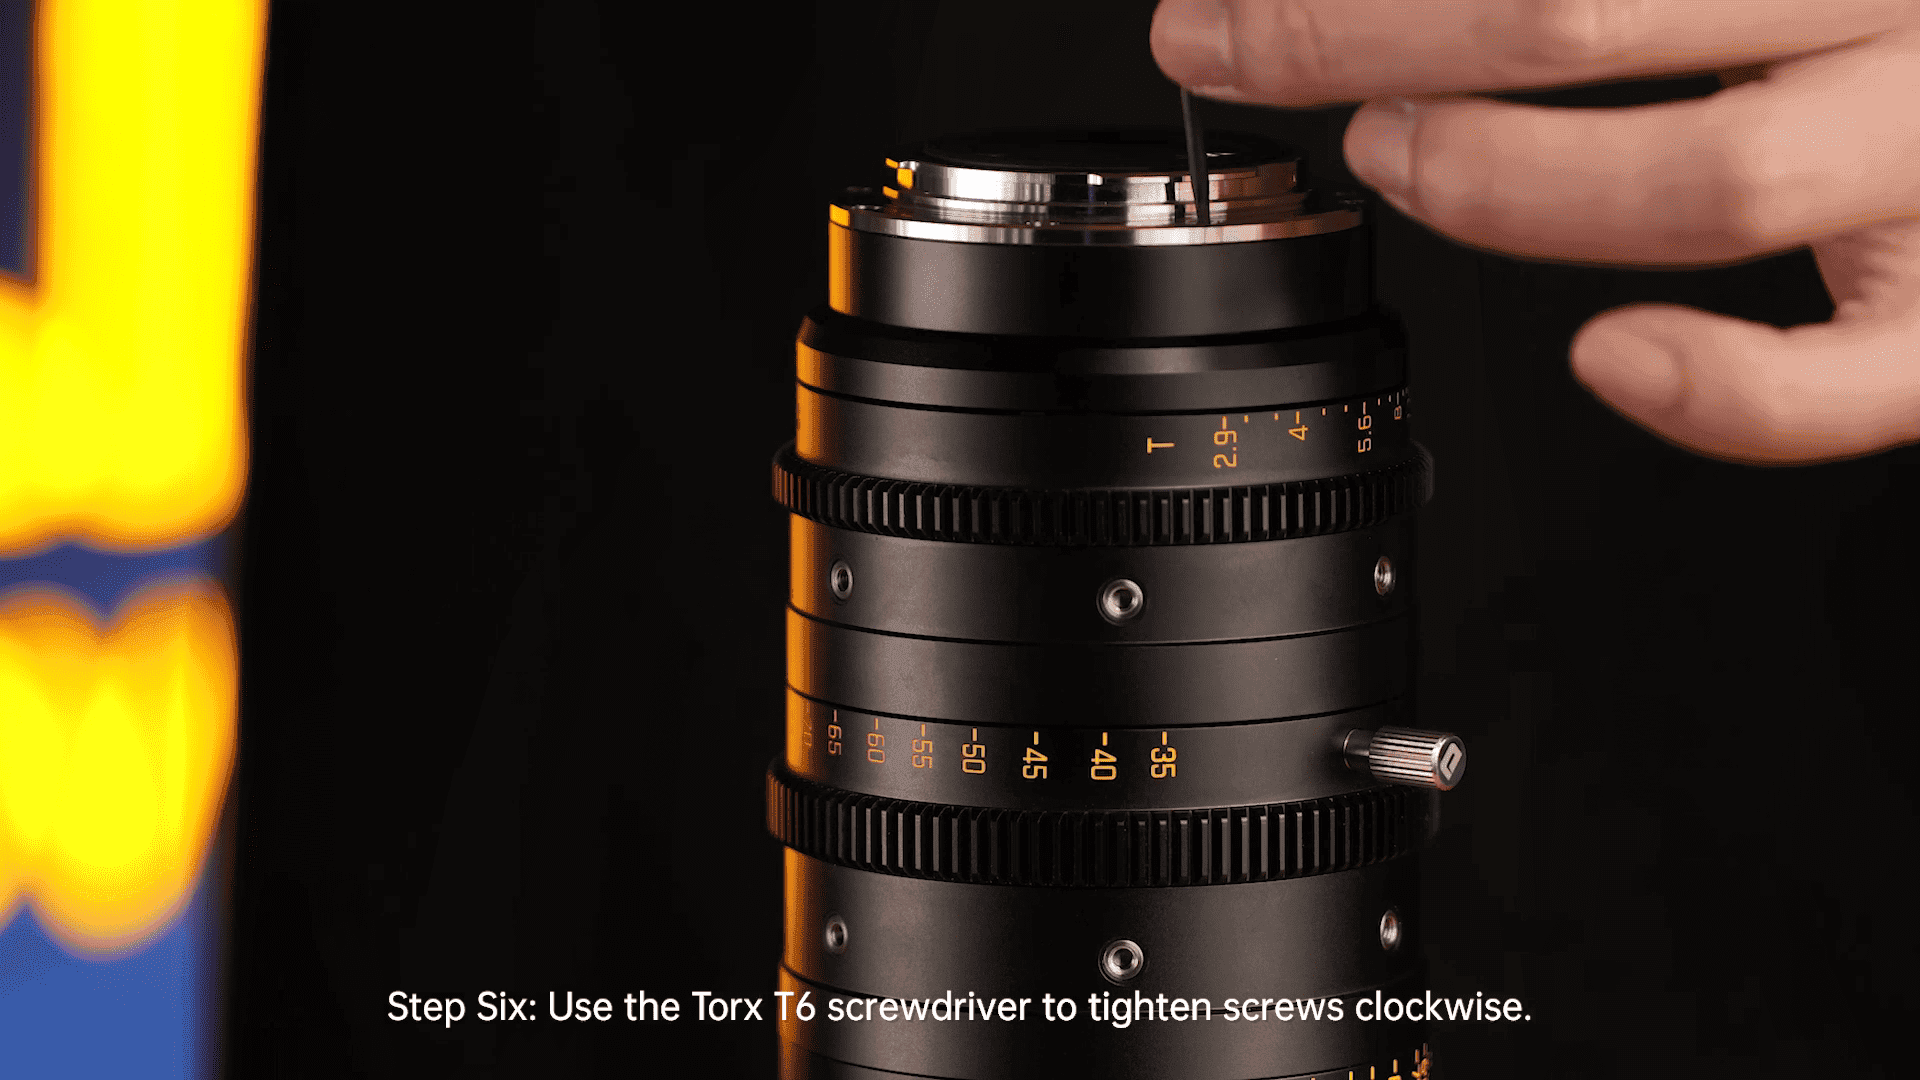
Step Six:Use the Torx T6 screwdriver to tighten screws clockwise.
Step seven:Check out if the mount is solid or not. if it fits perfectly and have no other issues, then the process of changing mount is finished.

" height="13.618421280523684px" id="gLRKei_eO" transform="translate(15.003 6.382)" width="14.375224059059507px"/><path d="M 6.28 27 L 0 20.87 L 0 6.13 L 6.28 0 L 36.912 0 L 43.192 6.13 L 43.192 20.87 L 43.041 21.017 L 36.912 27 Z M 42.192 6.551 L 36.504 1 L 6.687 1 L 1 6.551 L 1 20.449 L 6.687 26 L 36.504 26 L 42.192 20.449 Z" fill="rgb(153, 153, 153)" height="27px" id="k26lQwxi8" width="43.191635px"/></svg>)
" height="13px" id="YYKTeegNX" transform="translate(17.64 7)" width="10.547910000000002px"/><path d="M 6.28 27 L 0 20.87 L 0 6.13 L 6.28 0 L 36.912 0 L 43.192 6.13 L 43.192 20.87 L 43.041 21.017 L 36.912 27 Z M 42.192 6.551 L 36.504 1 L 6.687 1 L 1 6.551 L 1 20.449 L 6.687 26 L 36.504 26 L 42.192 20.449 Z" fill="rgb(153, 153, 153)" height="27px" id="VmqdrW0GA" width="43.191635px"/></svg>)
" height="19.500002px" id="BB3yA8DzS" transform="translate(17.64 7)" width="9.2294226px"/><path d="M 6.28 27 L 0 20.87 L 0 6.13 L 6.28 0 L 36.912 0 L 43.192 6.13 L 43.192 20.87 L 43.041 21.017 L 36.912 27 Z M 42.192 6.551 L 36.504 1 L 6.687 1 L 1 6.551 L 1 20.449 L 6.687 26 L 36.504 26 L 42.192 20.449 Z" fill="rgb(153, 153, 153)" height="27px" id="syEKeQMBy" width="43.191635px"/></svg>)
" width="23.259145782488147px"><path d="M 0 23.663 L 0 0 L 23.259 0 L 23.259 23.663 Z" fill="rgba(0, 0, 0, 0)" height="23.663413071050876px" id="oli0qEMZr" transform="translate(0 0)" width="23.259145783215033px"/><path d="M 8.141 4.356 C 8.598 4.35 8.967 3.974 8.973 3.509 C 8.973 3.039 8.603 2.662 8.141 2.662 C 7.678 2.662 7.309 3.039 7.309 3.509 C 7.309 3.981 7.679 4.356 8.141 4.356 Z M 4.041 4.356 C 4.498 4.35 4.867 3.974 4.873 3.509 C 4.873 3.039 4.503 2.662 4.041 2.662 C 3.578 2.662 3.209 3.039 3.209 3.509 C 3.209 3.981 3.579 4.356 4.041 4.356 Z M 10.125 9.11 C 10.003 9.179 9.939 9.32 9.966 9.459 C 9.966 9.505 9.966 9.551 9.989 9.598 C 10.08 9.991 10.261 10.618 10.261 10.641 C 10.261 10.71 10.285 10.756 10.285 10.804 C 10.285 10.919 10.193 11.012 10.08 11.011 C 10.033 11.011 10.011 10.988 9.966 10.966 L 8.623 10.177 C 8.525 10.122 8.416 10.091 8.305 10.085 C 8.237 10.085 8.168 10.085 8.123 10.107 C 7.486 10.293 6.826 10.386 6.121 10.386 C 2.73 10.386 0 8.068 0 5.193 C 0 2.319 2.73 0 6.121 0 C 9.511 0 12.241 2.319 12.241 5.193 C 12.241 6.746 11.422 8.16 10.125 9.111 Z" fill="rgb(153, 153, 153)" height="11.011057194726964px" id="Br5NMeMY9" transform="translate(10.247 9.09)" width="12.241159174366135px"/><path d="M 12.8 13.013 C 12.686 13.33 12.411 13.434 11.975 13.324 C 11.943 13.324 11.909 13.324 11.872 13.324 C 11.454 13.327 10.854 13.359 10.074 13.419 L 10.061 13.42 L 7.859 13.475 L 7.85 13.475 C 6.991 13.466 6.148 13.344 5.321 13.108 L 5.309 13.105 C 5.3 13.104 5.286 13.104 5.267 13.104 C 5.221 13.105 5.179 13.118 5.14 13.142 L 5.134 13.146 L 3.495 14.106 L 3.481 14.112 L 3.479 14.114 C 3.346 14.182 3.222 14.215 3.106 14.215 C 2.607 14.21 2.355 13.954 2.349 13.449 C 2.349 13.353 2.37 13.247 2.411 13.131 C 2.416 13.117 2.419 13.107 2.421 13.101 L 2.458 12.989 L 2.46 12.987 C 2.461 12.984 2.462 12.981 2.463 12.978 C 2.485 12.902 2.514 12.798 2.549 12.669 C 2.621 12.406 2.685 12.159 2.742 11.929 C 2.745 11.902 2.75 11.873 2.756 11.842 L 2.756 11.842 C 0.919 10.513 0 8.811 0 6.736 C 0 4.856 0.781 3.258 2.343 1.94 C 3.877 0.647 5.721 0 7.877 0 C 9.713 0 11.346 0.486 12.775 1.457 C 14.207 2.43 15.124 3.674 15.527 5.189 L 15.545 5.254 L 15.545 5.267 C 15.811 6.504 15.862 7.35 15.696 7.807 C 15.524 8.282 15.201 8.466 14.729 8.359 C 14.608 8.364 14.545 8.387 14.54 8.428 C 14.521 8.57 14.583 8.905 14.726 9.433 C 14.891 10.041 14.98 10.498 14.991 10.805 C 15.015 11.422 14.83 11.9 14.438 12.239 C 13.977 12.637 13.435 12.768 12.812 12.631 C 12.857 12.738 12.853 12.865 12.8 13.013 Z M 11.343 12.314 C 11.384 11.873 11.529 11.586 11.779 11.452 C 11.998 11.335 12.307 11.359 12.705 11.524 C 13.152 11.71 13.507 11.69 13.768 11.464 C 14.01 11.255 14 10.667 13.738 9.701 C 13.559 9.041 13.488 8.572 13.524 8.294 C 13.608 7.659 14.021 7.338 14.763 7.333 C 14.814 7.004 14.737 6.372 14.533 5.438 C 14.194 4.175 13.416 3.131 12.2 2.304 C 10.944 1.451 9.503 1.024 7.877 1.024 C 5.971 1.024 4.346 1.591 3.003 2.723 C 1.684 3.836 1.024 5.174 1.024 6.736 C 1.024 8.466 1.805 9.894 3.366 11.019 L 3.372 11.024 L 3.379 11.028 C 3.647 11.235 3.782 11.509 3.783 11.85 C 3.783 11.899 3.777 11.958 3.763 12.029 L 3.761 12.014 L 3.761 12.076 L 3.746 12.136 C 3.674 12.429 3.609 12.679 3.55 12.886 L 4.604 12.269 C 4.8 12.148 5.014 12.085 5.245 12.08 C 5.391 12.08 5.513 12.095 5.61 12.125 C 6.343 12.334 7.091 12.442 7.852 12.45 L 10.008 12.397 C 10.529 12.356 10.974 12.329 11.343 12.314 Z M 2.758 11.848 L 2.759 11.853 C 2.759 11.851 2.759 11.849 2.758 11.848 Z" fill="rgb(153, 153, 153)" height="14.215359948493736px" id="gd3JZ_4KH" transform="translate(1.595 2.836)" width="15.791221234487974px"/><path d="M 0 0.968 C 0 1.508 0.421 1.936 0.951 1.936 C 1.481 1.936 1.902 1.486 1.902 0.968 C 1.902 0.427 1.481 0 0.951 0 C 0.421 0 0 0.427 0 0.968 Z M 4.873 0.968 C 4.873 1.508 5.293 1.936 5.824 1.936 C 6.355 1.936 6.774 1.486 6.774 0.968 C 6.774 0.427 6.355 0 5.824 0 C 5.293 0 4.873 0.427 4.873 0.968 Z" fill="rgb(153, 153, 153)" height="1.9356364891053612px" id="gMaPkz8GR" transform="translate(5.979 6.538)" width="6.774188851777463px"/></g><path d="M 6.235 27.659 L 0 21.374 L 0 6.284 L 6.235 0 L 36.643 0 L 42.878 6.284 L 42.878 21.374 L 42.729 21.524 L 36.643 27.659 Z M 41.854 6.706 L 36.217 1.024 L 6.661 1.024 L 1.024 6.706 L 1.024 20.953 L 6.661 26.634 L 36.217 26.634 L 41.854 20.953 Z" fill="rgb(153, 153, 153)" height="27.658536585365855px" id="jorPlxop0" transform="translate(0 -0.33)" width="42.87804175609756px"/></svg>)
" height="14.648779520910622px" id="Hj12XRHU5" transform="translate(13.829 5.89)" width="15.695120452005867px"/><path d="M 6.235 27.659 L 0 21.374 L 0 6.284 L 6.235 0 L 36.643 0 L 42.878 6.284 L 42.878 21.374 L 42.729 21.524 L 36.643 27.659 Z M 41.854 6.706 L 36.217 1.024 L 6.661 1.024 L 1.024 6.706 L 1.024 20.953 L 6.661 26.634 L 36.217 26.634 L 41.854 20.953 Z" fill="rgb(153, 153, 153)" height="27.658536585365855px" id="AgPJF4fHG" transform="translate(0 -0.33)" width="42.87804175609756px"/></svg>)
" height="296px" id="yr0S_nuVq" transform="translate(7 20.125)" width="1502.8492273582206px"/></svg>)